Monday 30 April 2012

gumpaste cow tutorial

hi guys, here is my second tutorial, sorry its a bit late, had a crazy busy weekend, with meetings and cakes and a sick child! but i made it through and here goes!


here is all the things i used to make my cow, although there were a few things i forgot to add to the pic, a round piping tip, a ruler, a tooth pick and i used a cutting wheel, but a sharp knife or exacto blade works as well!


roll out white paste (fondant mixed with tylose) and cut four pieces to make the legs


using a round piping tip the same size as your legs, cut out the hoofs and attach to bottom of legs and then poke into Styrofoam or oasis.
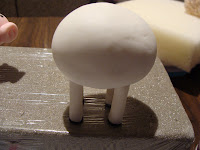


roll out a ball of white paste for the body and glue onto the legs
(your legs need to have dried a little before this so that they don't squish down with the weight of the body, but if you added tylose it doesn't take very long)


next i made the spots for the cow, i just look little bits of black fondant and flattened them with my fingers into random shapes and sizes, you could roll it out and cut the shapes, but i thought this way would be a little more natural and random

glue onto body and insert some spaghetti where you will attach the head


i really enjoyed making this cow, and got a bit carried away and forgot to take some pics!

make a head out of paste and glue in place, add a few spots, make a wee oval shaped piece and glue onto head for muzzle.

support the weight of the head with balled up glad wrap over night until it has dried and will support itself.
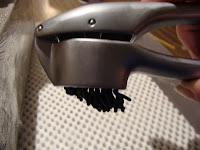


my 'secret weapon' use a garlic press to make hair from black fondant. (if it is too stiff, knead a little kremelta into the fondant before squeezing)


make two small triangles for ears and indent the middles


glue on hair and ears,

and some more things i didn't photograph, draw eyes, make little horns out of flesh or light brown fondant, and glue in place, and i also made 2 little indents in the muzzle for nostrils and placed small circles of the flesh fondant in the dents


make some tails, i like to have spares just in case. and set aside to dry overnight. glue some hair onto the end, and once it  has dried turn it over and add some more hair on the underside.


 make a hole in the rear for the tail to go, and make sure it is big enough to fit the tail once it has dried.


roll out some red fondant and cut a thin strip for the collar


glue the collar in place and make a small yellow bell shape and glue onto the collar.

and attach the tail into the hole you made.


and you are done! here is the finished animals on the cake, and if you would like to see photos of all my cakes check out
 http://www.facebook.com/pages/Arbitrary-Cakes/181092665295987?ref=ts


until next time, happy caking everyone!

Monday 23 April 2012

gumpaste pig tutorial

ok so here goes my first attempt at a tutorial!
if you are a fan of Arbitrary Cakes on facebook you will know that i am taking suggestions for things you would like to see in a tutorial, but in the mean time, when i have a cake to do (and if i have time!) i will take pics as i go with the good intentions to turn it into tutorials!

i am doing a farm themed cake this weekend so here is the pig i just made and i will try to explain what i did!

sorry about the photo quality, i made this at night and the lighting is terrible!


here goes.......


firstly i started with pink fondant, which i kneaded in a little tylose to make a kind of gumpaste and rolled out 4 legs, and poking some dry spaghetti through each leg (you can use toothpicks or wire but i like to make mine out of completely edible components whenever possible) i then rolled out a tiny bit of black fondant and used a round piping tip number 12 to cut out circles for the hoofs, and poked onto the spaghetti and glued (water with a pinch of tylose powder, but plain water works just as well) in place.
 i have poked the legs into a piece of florist oasis covered in glad wrap, but you could also use polystyrene.


then roll out a small piece of paste to quite skinny and wrap around a tooth pick or something similar to make a tail.. (for delicate pieces i like to make a couple extras as they are prone to breaking, so i would make maybe 3 wee tails and set aside to go hard, usually overnight.


brush the top of the legs and spaghetti with glue and then form some more pink paste into a ball and place it on top of the legs


roll a smaller ball for the head, and insert some spaghetti, glue and poke into the body, use some balled up glad wrap to hold the head in place until the glue has set (see photo below)


make a small oval shape for the snout and indent for the nostrils, then glue into place on the head


poke a hole on the bum for where the tail will go, make sure it is wide enough to actually fit the end of your tail in, as you need to let the tail dry completely so that it is hard when you insert it.


make two little triangles and then indent the insides to look like ears. glue into place on head


i used an edible ink pen to draw the eyes, but you could paint on with food colouring, or make tiny dots out of black fondant.


and lastly remove the glad wrap support and voila! you have a cute little pig perfect for a farm themed cake!

i will post a photo of the finished cake when it is all together!


 i hope this was helpful, it is very basic and you can adapt and add any extra details you want to fit you needs, you could add a little bow on the head to make it a girl pig!


let me know what you think! and if you have a questions feel free to ask!

Welcome to my caking adventures!

well, this is my very fist blog, EVER!
I'm not too sure where to begin, if you are following my facebook page Arbitrary Cakes you will know that it is coming up to one year since i decorated my first cake, and those of you who know me will know how much cake decorating has taken over my life!

but for those of you out there in cyber space reading this who don't know me, i will tell you a little about myself.
i am a stay at home mum of one very time consuming gorgeous wee man who has just last week learnt to walk, yay, and now i really will have my hands full!

before he came along i had always been a workaholic, and i wasn't too sure how i would cope being a stay at home mum, I'm not one to just sit around, and lets face it, i would much rather have something to do other than housework!

i have always worked in the fashion and sewing industry, and i love to sew (maybe i will share this blog with any exciting sewing or crafts i do also) but i have become completely and utterly consumed by all things cake! i just love it and cant get enough!
its a fantastic hobby that i can do at home and work around my son, and best of all I'm just so passionate about it!

it all began by watching Ace of Cakes on the food network channel (oh my gosh i love duff! he is just incredible! and i fell in love with all the gang that work at charm city cakes) i watched back to back episodes and was gutted when it finished!

anyway I've always been a bit of a baker, but never even imagined cake decorating!
so i thought i would start with something easy, i decided to make some carrot cake cupcakes to take in to the nurses in the Dunedin N.I.C.U. (my son and i spent 3 1/2 months in N.I.C.U. when he was born extremely prematurely, and i am eternally grateful for the amazing work that they do and everything that they did for us)
and i thought i would make some wee carrots out of icing for on the tops, i googled for instructions and i think from memory i found out how to make icing carrots from cake decorating for dummies!

and the rest, as they say, is history!